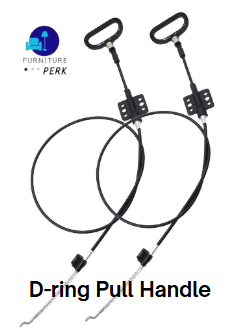
Are you frustrated with the broken D-ring handle of your recliner?
Looking for the easiest way to fix it at home?
Then, you have come to the right place.
This post is all about how to replace d-ring recliner handle at home.
It’s relatively straightforward, and with a little effort, you can definitely fix this damaged part yourself—no need to call a professional. You’ll only need a couple of tools and follow a few simple steps.
So, let’s see how to fix a recliner handle successfully.
Table of Contents
How to Replace D-Ring Recliner Handle-Step By-Step Guidelines


D-ring handles and cables are crucial parts of a recliner. It may wear and tear, and over time, it may get stripped or broken.
A damaged or broken cable makes your reclining chair malfunction.
Follow the step-by-step instructions below to fix it at home.
Tools and Materials You’ll Need
- A phillips head screwdriver (You can also use a manual or electric screwdriver)
- A pair of needle-nose pliers
- Replacement handle and cable (You can buy it online; contact the manufacturer or your recliner supplier to buy one)
Step by Step Instructions for Recliner Handle and Cable Installation (Flapper and D-pull style):
The flapper and D-pull style handles function the same. The difference is in their location only. The flapper style mounts on the outside arm, whereas the D-pull type mounts in between the cushions.
Step 1: Inspect the issue
Pull the handle to open the ottoman. Check the D-pull or lever on the handle.
Step 2: Remove the screws holding the handle
You’ll find two wood screws holding the handle in place. In the flapper style handle, these screws are located on the outside arm. For the D-pull handle, you’ll find the screws between the cushions. In general, these screws are positioned at the bottom and top of the lever.
Remove these two wood screws with the help of the screwdriver. But don’t try to take the handle and cable out yet. Let the piece hang. Don’t overdo; it may rip the chair’s leather or fabric.
Screws don’t come included with the replacement handle and cable. So you should keep the screws in a safe place for using them back again.
Step 3: Find where the bottom end of the existing cable comes from
After taking off the handle, now you’ll need to get to the bottom end of the cable that connects to the chair. For this, you have to flip the recliner on its back so that the headrest touch the ground.
You can lay a protective sheet on the floor to avoid any damage to the recliner’s fabric or leather.
When your chair is standing on its back on the floor, you can see the chair’s bottom and find the bottom end of the existing cable.
The cable end is attached to the mechanism release trigger in two places- at the mechanism release clip and S-shaped tip.
Step 4: Remove the mechanism release trigger
Once you locate the piece, use your hand to release the locking mechanism on the recliner. There is a little hook or S-shaped tip that connects the cable to the chair. Locate it and remember where it was for later reference.
First, release the tension on the recliner cable by removing the S-tip. To release the tension, pull the mechanism release trigger towards you.
Next, squeeze the clip that is attaching the lever and the plastic cable cover to the chair. Use the needle-nose pliers or flat head screwdriver to pull the clip so that it comes out of where it is connected. Take off the mechanism release clip out of the slot. If the clip break, don’t worry as you’re not going to use it again.
After removing the S-shaped tip and mechanism release clip, pull the entire mechanism out of the hole from the level side.
This step requires a little patience and determination.
Step 5: Insert the replacement pull handle cable.
For this, you have to reverse the steps as mentioned above simply.
Take the new mechanism and gently feed the replacement cable back through the side of the recliner in the way you took out of the broken one. From the underside, pull out the piece.
Place the clip back into the slot where you removed the old clip. Fix the clip into place by rocking it back and forth carefully. Keep doing that until it snaps into place perfectly.
Gently pull the trigger towards you and insert the S-tip into the hole of the trigger. You may need to push the lever down to do it correctly.
Step 6: Fix back the handle
First, make your chair to stand in the upright position. Fix the handle into the empty slot. Make sure you line up the holes.
Do you remember the two screw you unscrewed from the handle? Now, it’s time to put them back.
Insert back the two wood screws (that you removed earlier) using the screwdriver.
Step 7: Testing and relaxing
Now, it’s time to test the handle and cable to ensure it works correctly.
If it doesn’t function properly, probably you’ve done something wrong during the replacement. To solve it, re-trace the steps and make sure correction where necessary.
Sit and relax on your fabric or leather recliner. Pull the handle. Do it several times to make sure it works smoothly and doesn’t get stuck.
Pull the handle to stretch the footrest, lean over and stretch your legs.
Job well done!
This is how to replace d-ring recliner handle and cable.
As you see, no experience is needed to replace a recliner handling cable, fix it yourself anytime you come across the same issue.
This DIY installation will save you some bucks, and you’ll be able to gain knowledge about the replacement process.
